Hardware-in-the-Loop Setup
Overview
This page is for hardware-specific setup notes. General workspace installation, Python dependencies, and simulator launch checks live in Installation and Build.
Prerequisites
BlueOS must be running on
aarch64.Install the BlueOS ROS 2 extension on the vehicle companion computer.
Apply the configuration settings from the BlueOS ROS 2 extension thread.
Launch Direction
Use the hardware launch arguments only when the corresponding hardware is connected and configured:
ros2 launch ros2_control_blue_reach_5 robot_system_multi_interface.launch.py \
    use_manipulator_hardware:=true \
    use_vehicle_hardware:=true \
    sim_robot_count:=0 \
    task:=interactive
Mixed hardware/simulation launches use the same launch file with one hardware flag enabled and the other disabled.
BlueROV Thruster Mapping and Sign Check
Before closed-loop vehicle tests, verify that the BlueROV thruster channel mapping and forward/reverse directions match the convention implemented by the vehicle hardware interface. The framework assumes the thruster numbering and positive force directions shown below.
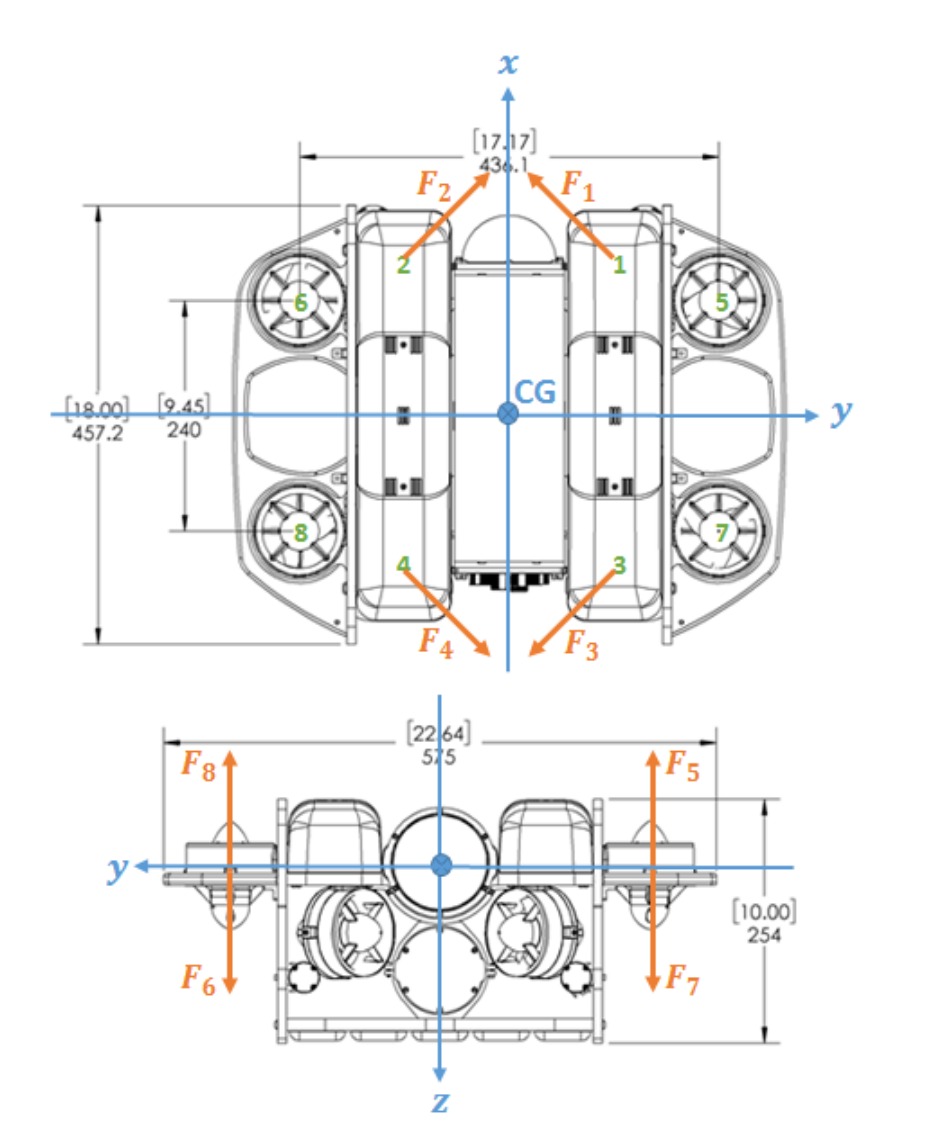
Use the direct-thruster keyboard task for the in-water check. See Direct Thruster Keyboard Task for the launch command and key mapping. Test one thruster channel at a time before running any vehicle feedback controller:
The keyboard channel drives the physical thruster with the same number as the diagram.
Positive and negative commands produce thrust in the expected forward/reverse directions.
If a keyboard channel drives the wrong physical thruster, fix the BlueROV
thruster output mapping before running feedback control. If a thruster spins in
the wrong forward/reverse direction, use the thruster direction parameter in
description/ros2_control/vehicle_system_multi_interface.ros2_control.xacro.
Set it to 1 or -1 for the affected thruster so the physical
forward/reverse direction agrees with the diagram. Incorrect mapping or
reversed thrust signs will make the vehicle controller apply the wrong body
wrench.
Architecture & HIL Presentation
For a detailed walkthrough of the hardware architecture and HIL test setup, consult the slide deck: